Start-to-finish Product Data Checks demo
Take one catalogue from its first scan through reading, fixing, dismissing, and scoping findings, then continue into publish-time enforcement, bulk fixing, export, and scheduled scans.
Reviewed 2026-09-15
This walkthrough follows one catalogue from end to end instead of explaining each screen on its own. The demo store sells physical goods, including a cotton t-shirt, a pullover hoodie, a ceramic mug, and a canvas tote in three colours. Like most real stores, some of them were published without the data fulfilment needs.
Complete the Free part first: it is the whole cycle of finding a problem and dealing with it. Continue into the clearly marked Premium steps only when the Pro add-on is installed and active.
What you will build
- A first scan of the catalogue, running in the background.
- A findings list grouped by check and then by product.
- One product fixed from the list, and one finding deliberately dismissed.
- One check narrowed to part of the catalogue, and one switched off.
- A rescan proving what you fixed is gone and what you dismissed stays gone.
- A Premium publish rule that warns on most checks and refuses on one.
- A whole check cleared in bulk from a single value.
- A CSV work list handed to somebody else, and a weekly scan that mails only what is new.
Nothing here changes a product except where a step says so, and no step needs demo data: run it against your own catalogue and it will find your own faults.
1. Install and open the screen
Edition: Free
Open: Plugins → Add Plugin → Upload Plugin
- Activate WooCommerce first. The plugin declares WooCommerce as a requirement and will not activate without it.
- Upload and activate Laqi Product Data Checks.
- Open WooCommerce → Product Data Checks.
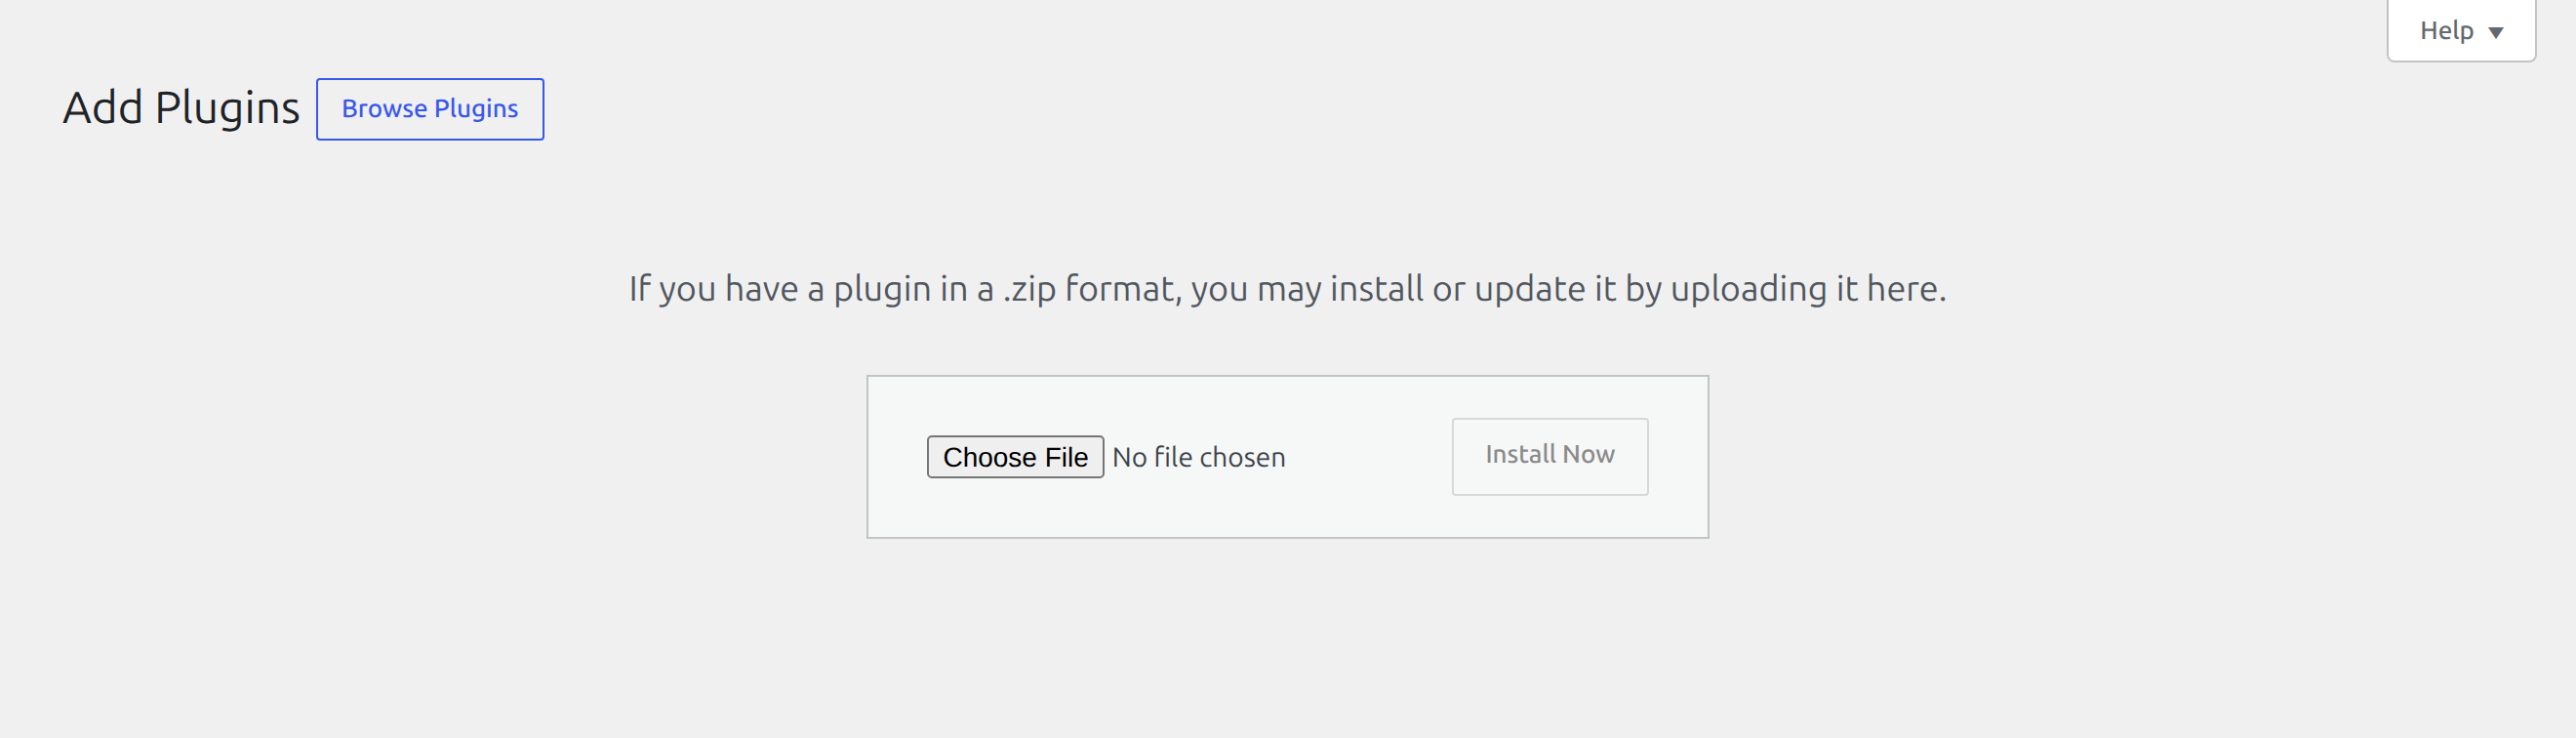
The screen opens saying the catalogue has not been scanned yet. Nothing has been read and nothing has been written; the plugin does no work until you ask it to.
2. Run the first scan
Edition: Free
Open: WooCommerce → Product Data Checks
- Press Scan now.
- Reload the screen while it works.
The scan runs in the background through Action Scheduler, in bounded batches, so a catalogue of any size does not tie up a page load. While it runs, the status line counts products checked so far and the heading action becomes Restart scan. This is also what to press if a scan ever appears stuck.
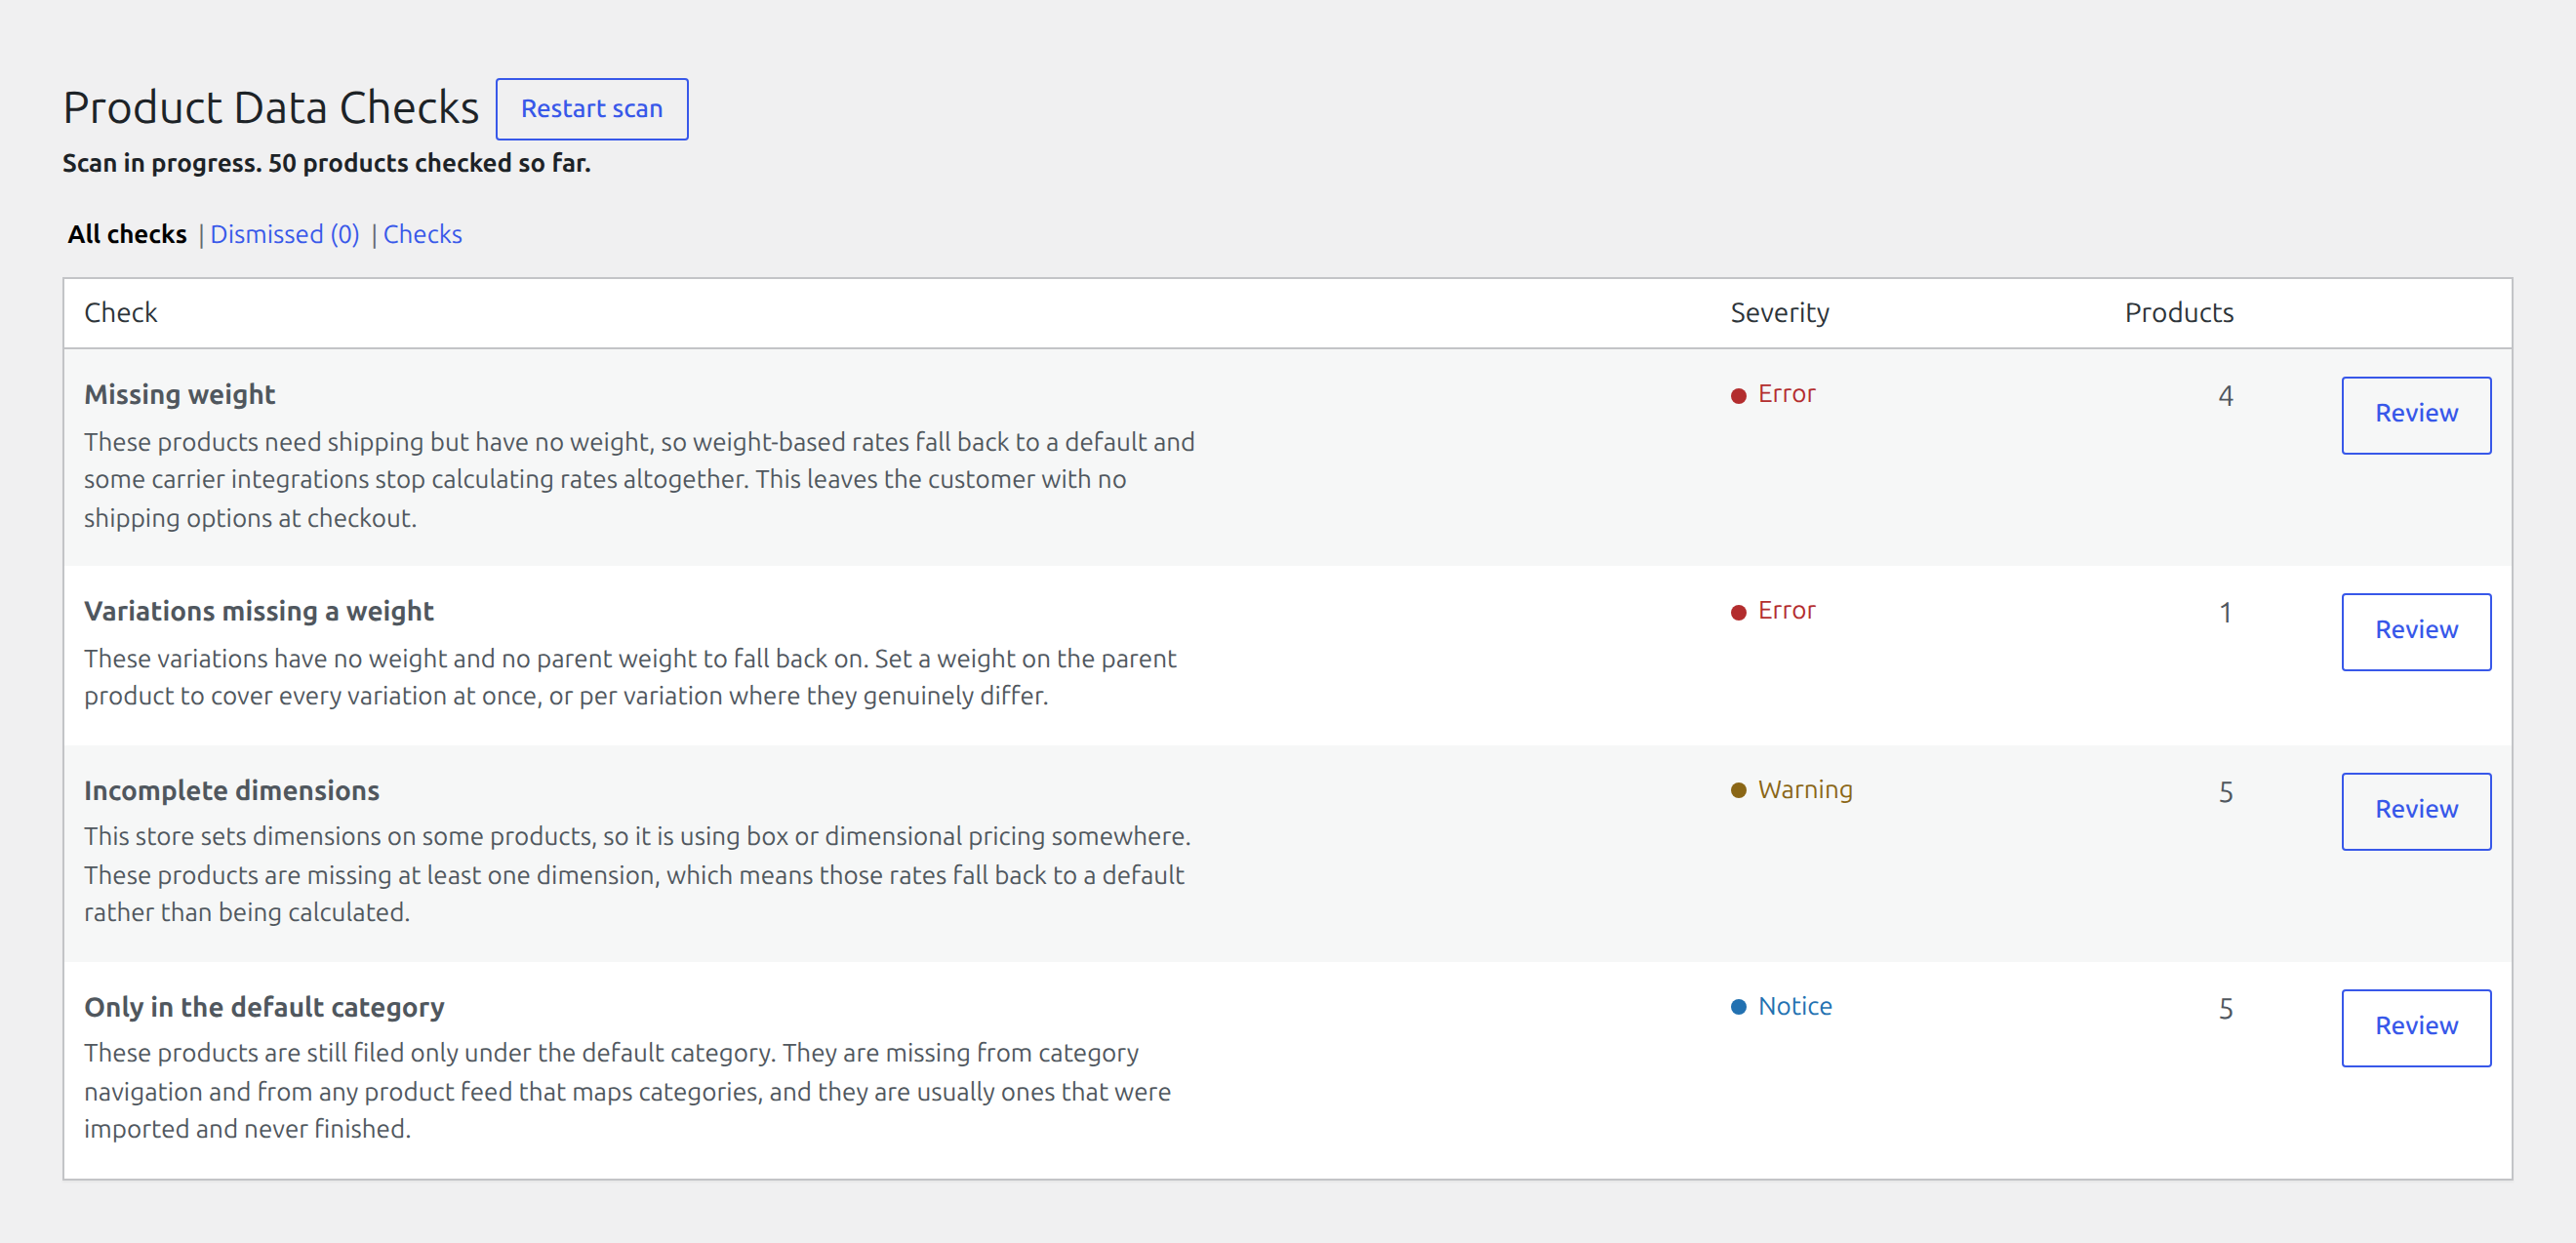
A scan reads every published product and variation except the ones never handed to a carrier: external and affiliate products, grouped products, and variable parents whose variations are checked instead. It changes nothing about your products.
3. Read what came back
Edition: Free
When the status line reads Last scanned, the list below it is the open findings. There is one row per check, each with a severity, a product count, and what the fault actually costs you.
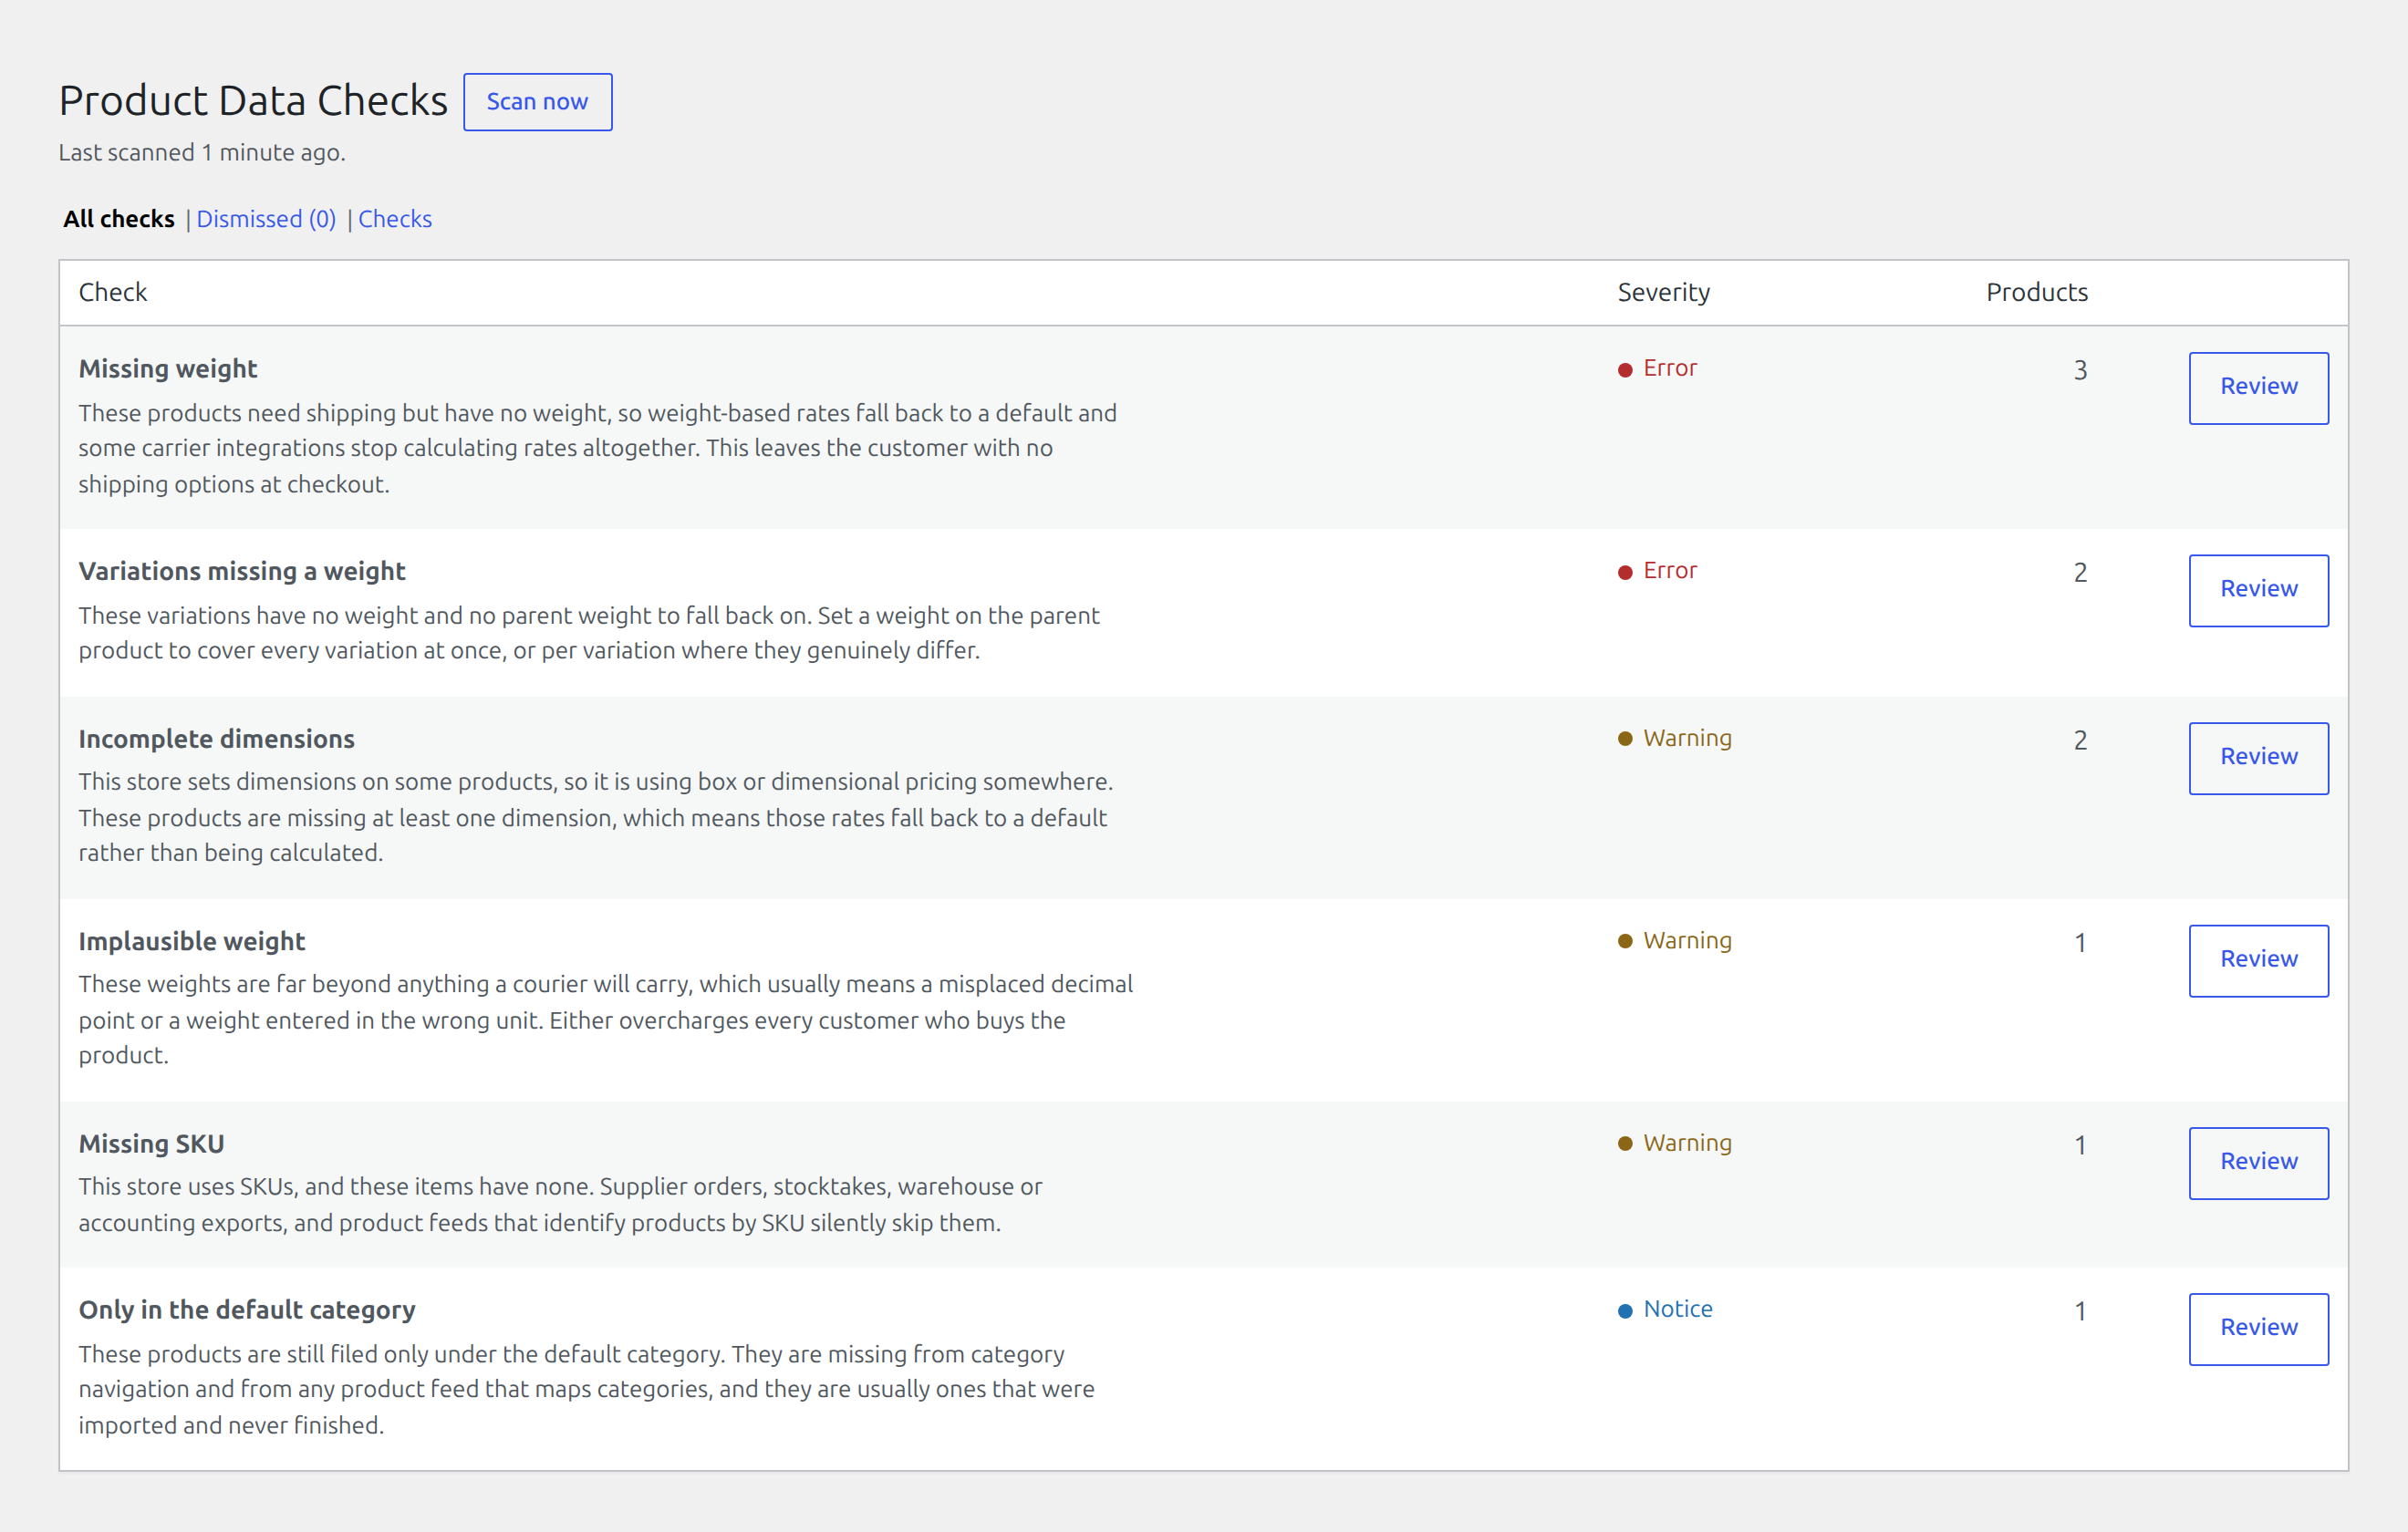
Read the severities as consequences:
- Error means the store loses money or the product cannot be bought. A shipped product with no weight is priced wrong on every order containing it.
- Warning means fulfilment or a product feed will go wrong, but the sale can still complete. A missing SKU is this.
- Notice is worth knowing, but nothing breaks today.
Start at the top. In this store that is Missing weight, three products.
4. Open one check and fix a product
Edition: Free
Open: WooCommerce → Product Data Checks → Review, on the Missing weight row
The check opens as its own list: the products failing it, each with Edit to go straight to the product and Dismiss to say it is fine as it is.
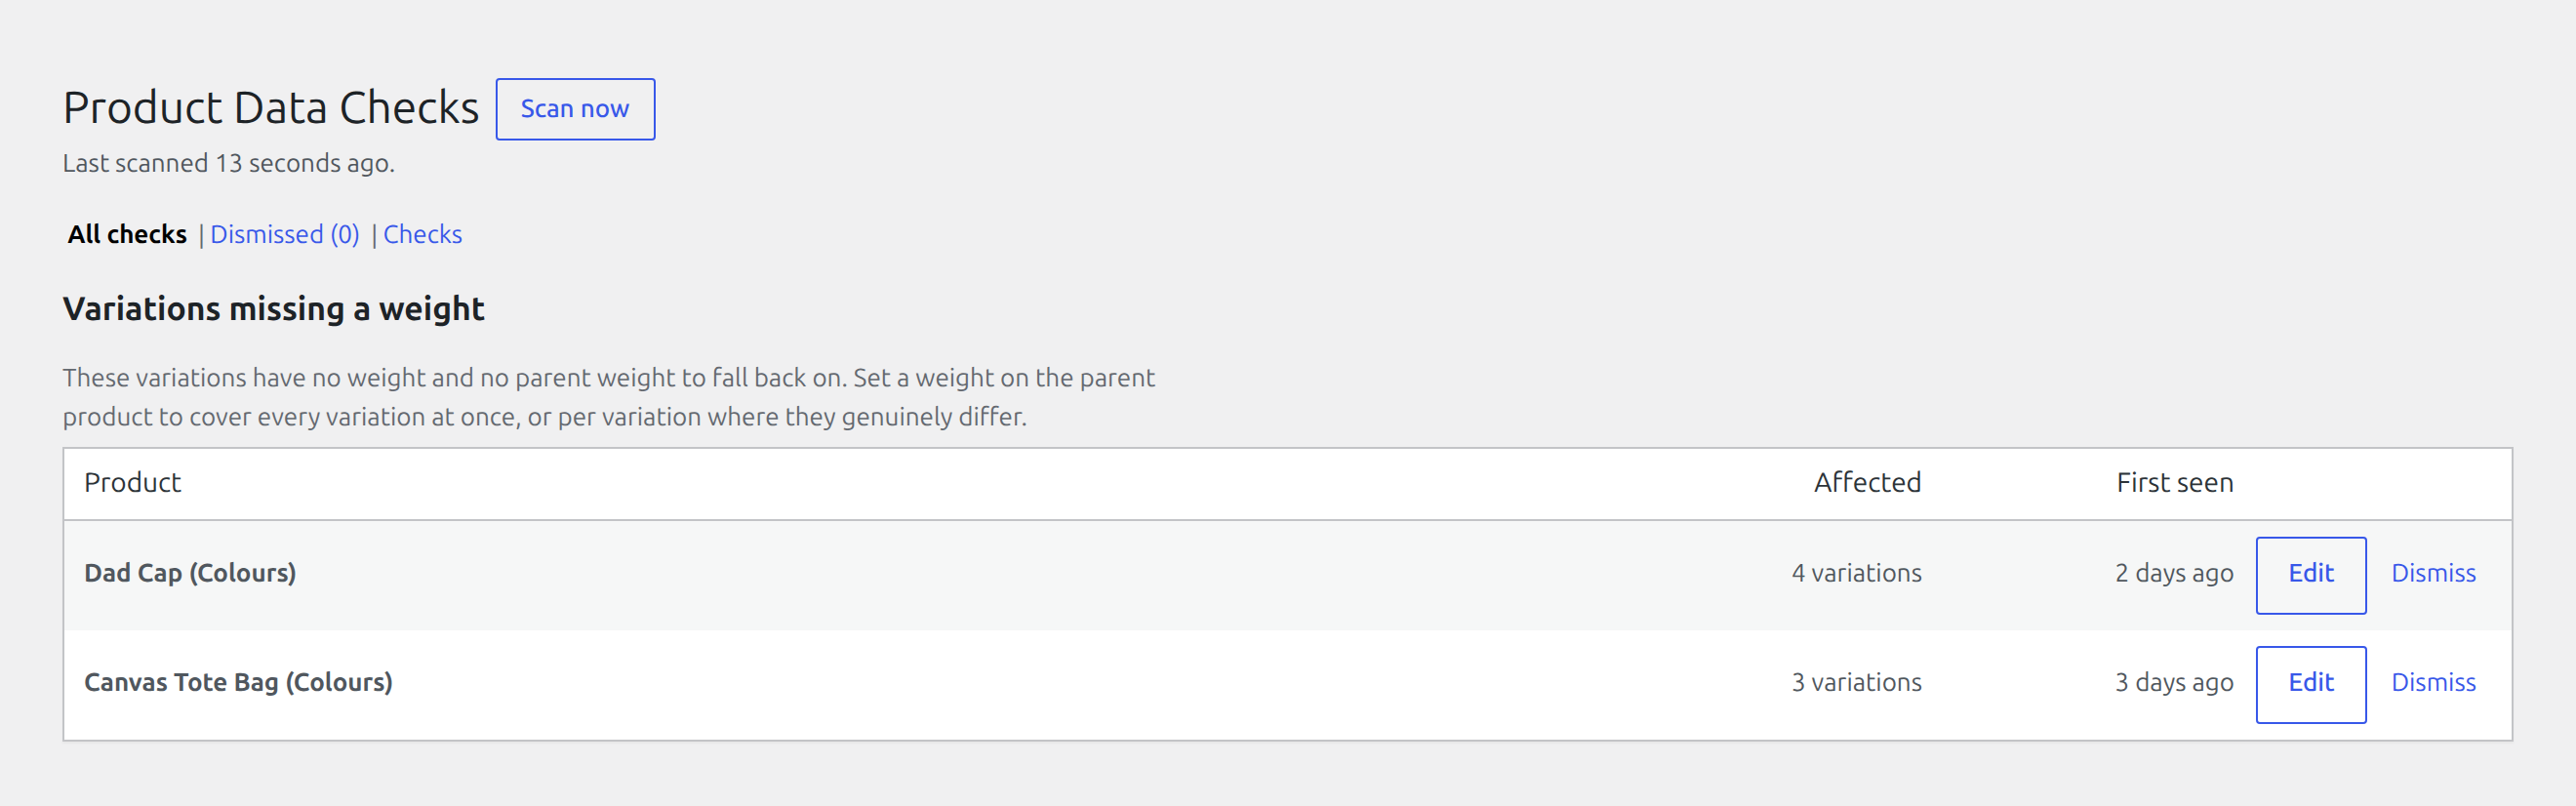
- Choose Edit on the ceramic mug.
- Set its shipping weight in the product’s Shipping tab.
- Update the product and go back to the check.
The finding is still listed: findings come from scans, not from page loads, so the list is what the last scan saw. Step 7 rescans and clears it.
Note the grouping while you are here. Variations missing a weight lists the canvas tote once, with the number of affected variations beside it. A product with two hundred unweighted variations is one row, not two hundred.
5. Dismiss what is deliberate
Edition: Free
Some findings are not mistakes. The demo store sells one bulky item that is collected from the shop and never handed to a carrier, so it has deliberately been given no weight.
- On the Missing weight list, choose Dismiss on that product.
- Open Dismissed from the navigation at the top of the screen to see it.
A dismissal says: this product, for this check, is not a problem. A later scan never undoes it. The scan decides whether the fault is still there, not whether you care about it. Nothing is hidden permanently: the Dismissed view is the way back.
6. Quiet a check that does not fit your store
Edition: Free
Open: WooCommerce → Product Data Checks → Checks
Dismissing the same finding a hundred times is the wrong tool. The Checks screen lists all fifteen with what each costs, what it applies to, and its own controls.
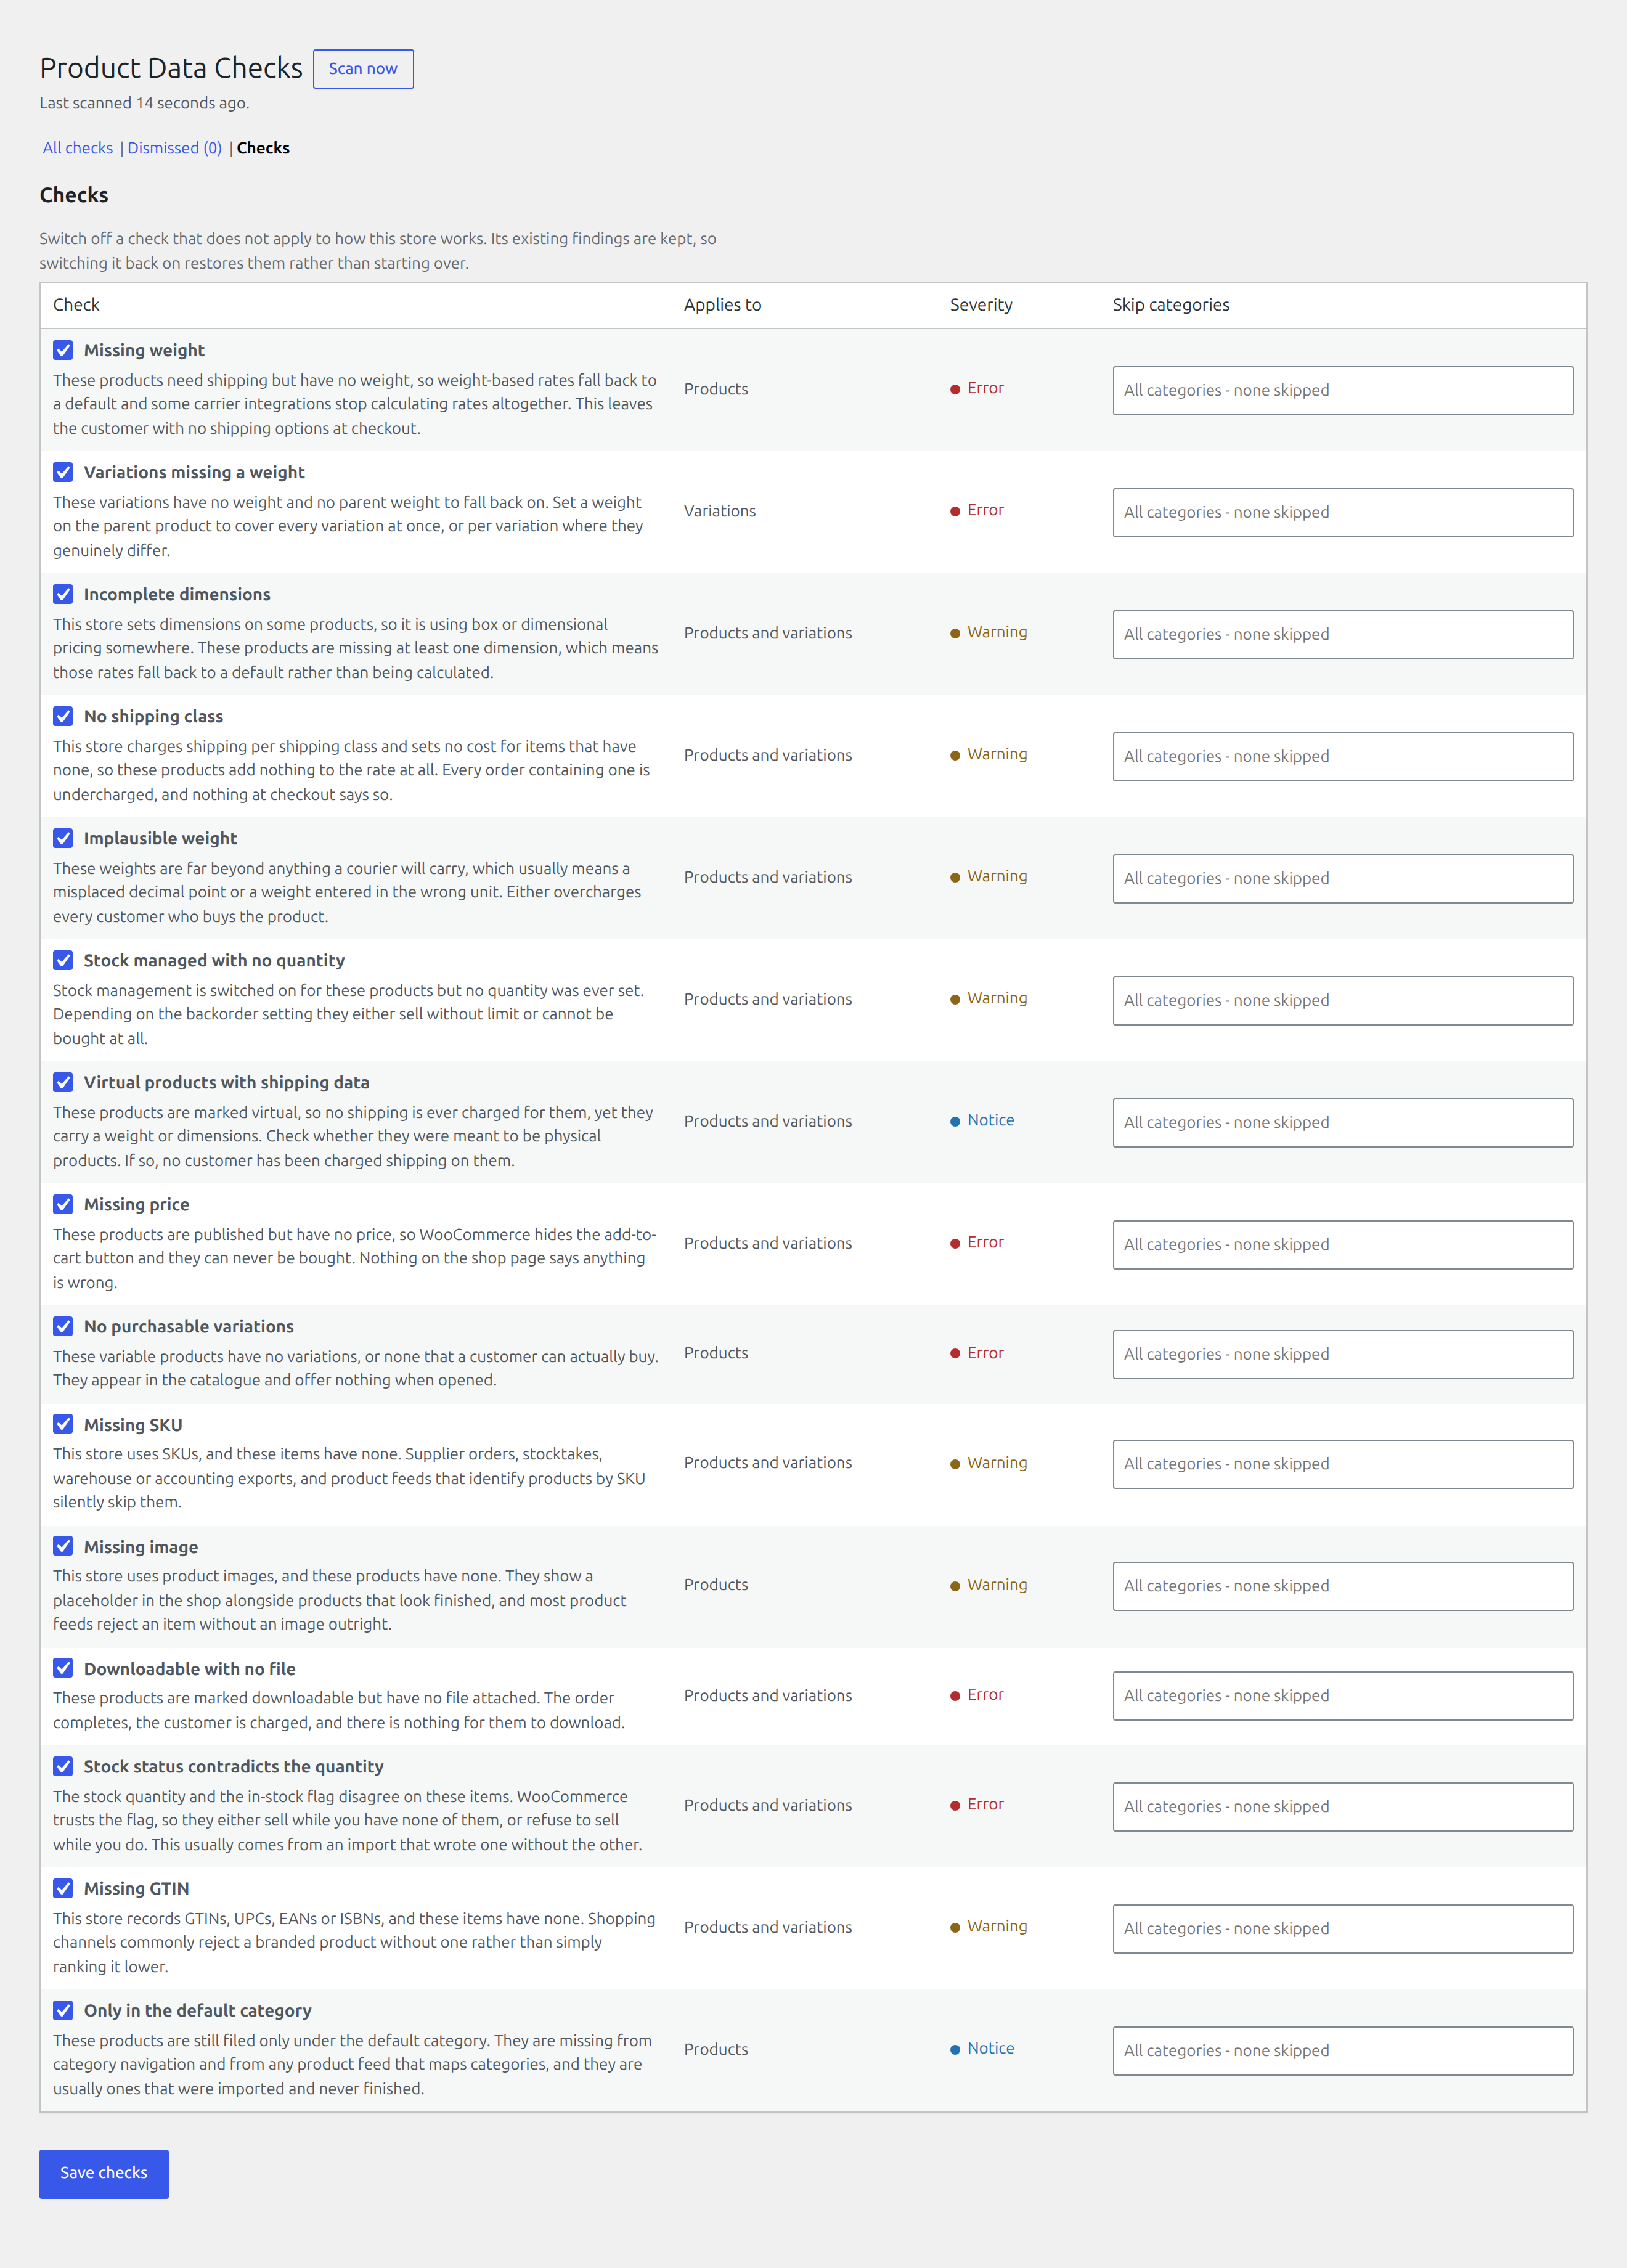
- Narrow Missing weight so it skips your Services category. This is the middle ground between “on for everything” and “off”.
- Switch off a check that does not fit how you work at all, such as Missing GTIN if you do not sell anything that has one.
- Save.
Switching a check off keeps its existing findings. Switching it back on restores them rather than starting over, so turning something off to get through a busy week costs nothing.
7. Rescan and confirm
Edition: Free
Press Scan now again and reload when it finishes.
- The mug you weighed is gone from Missing weight.
- The collect-in-person item you dismissed is still absent, and still listed under Dismissed.
- The category you scoped away is no longer reported.
Findings are remembered between scans, so if the mug’s weight is wiped by a later import it comes back as a regression rather than as a new finding: its First seen date is the day it first broke, not the day of this scan. That is usually a sign that an import is overwriting good data rather than that somebody made the same mistake twice.
That is the complete Free cycle: scan, review, fix or dismiss, rescan. Everything below prevents rather than reports, and needs the Pro add-on.
8. Premium continuation: install the add-on
Edition: Premium
Open: Plugins → Add Plugin → Upload Plugin
Upload and activate Laqi Product Data Checks Pro beside the free plugin. It is a separate plugin that requires Free and will not activate without it, and it owns no admin page of its own: everything below appears on the screens you have already been using.
9. Premium continuation: decide what a bad save should do
Edition: Premium
Open: WooCommerce → Product Data Checks → Checks
Pro adds an At publish column beside each check, with three settings: Nothing, Warn, and Block.
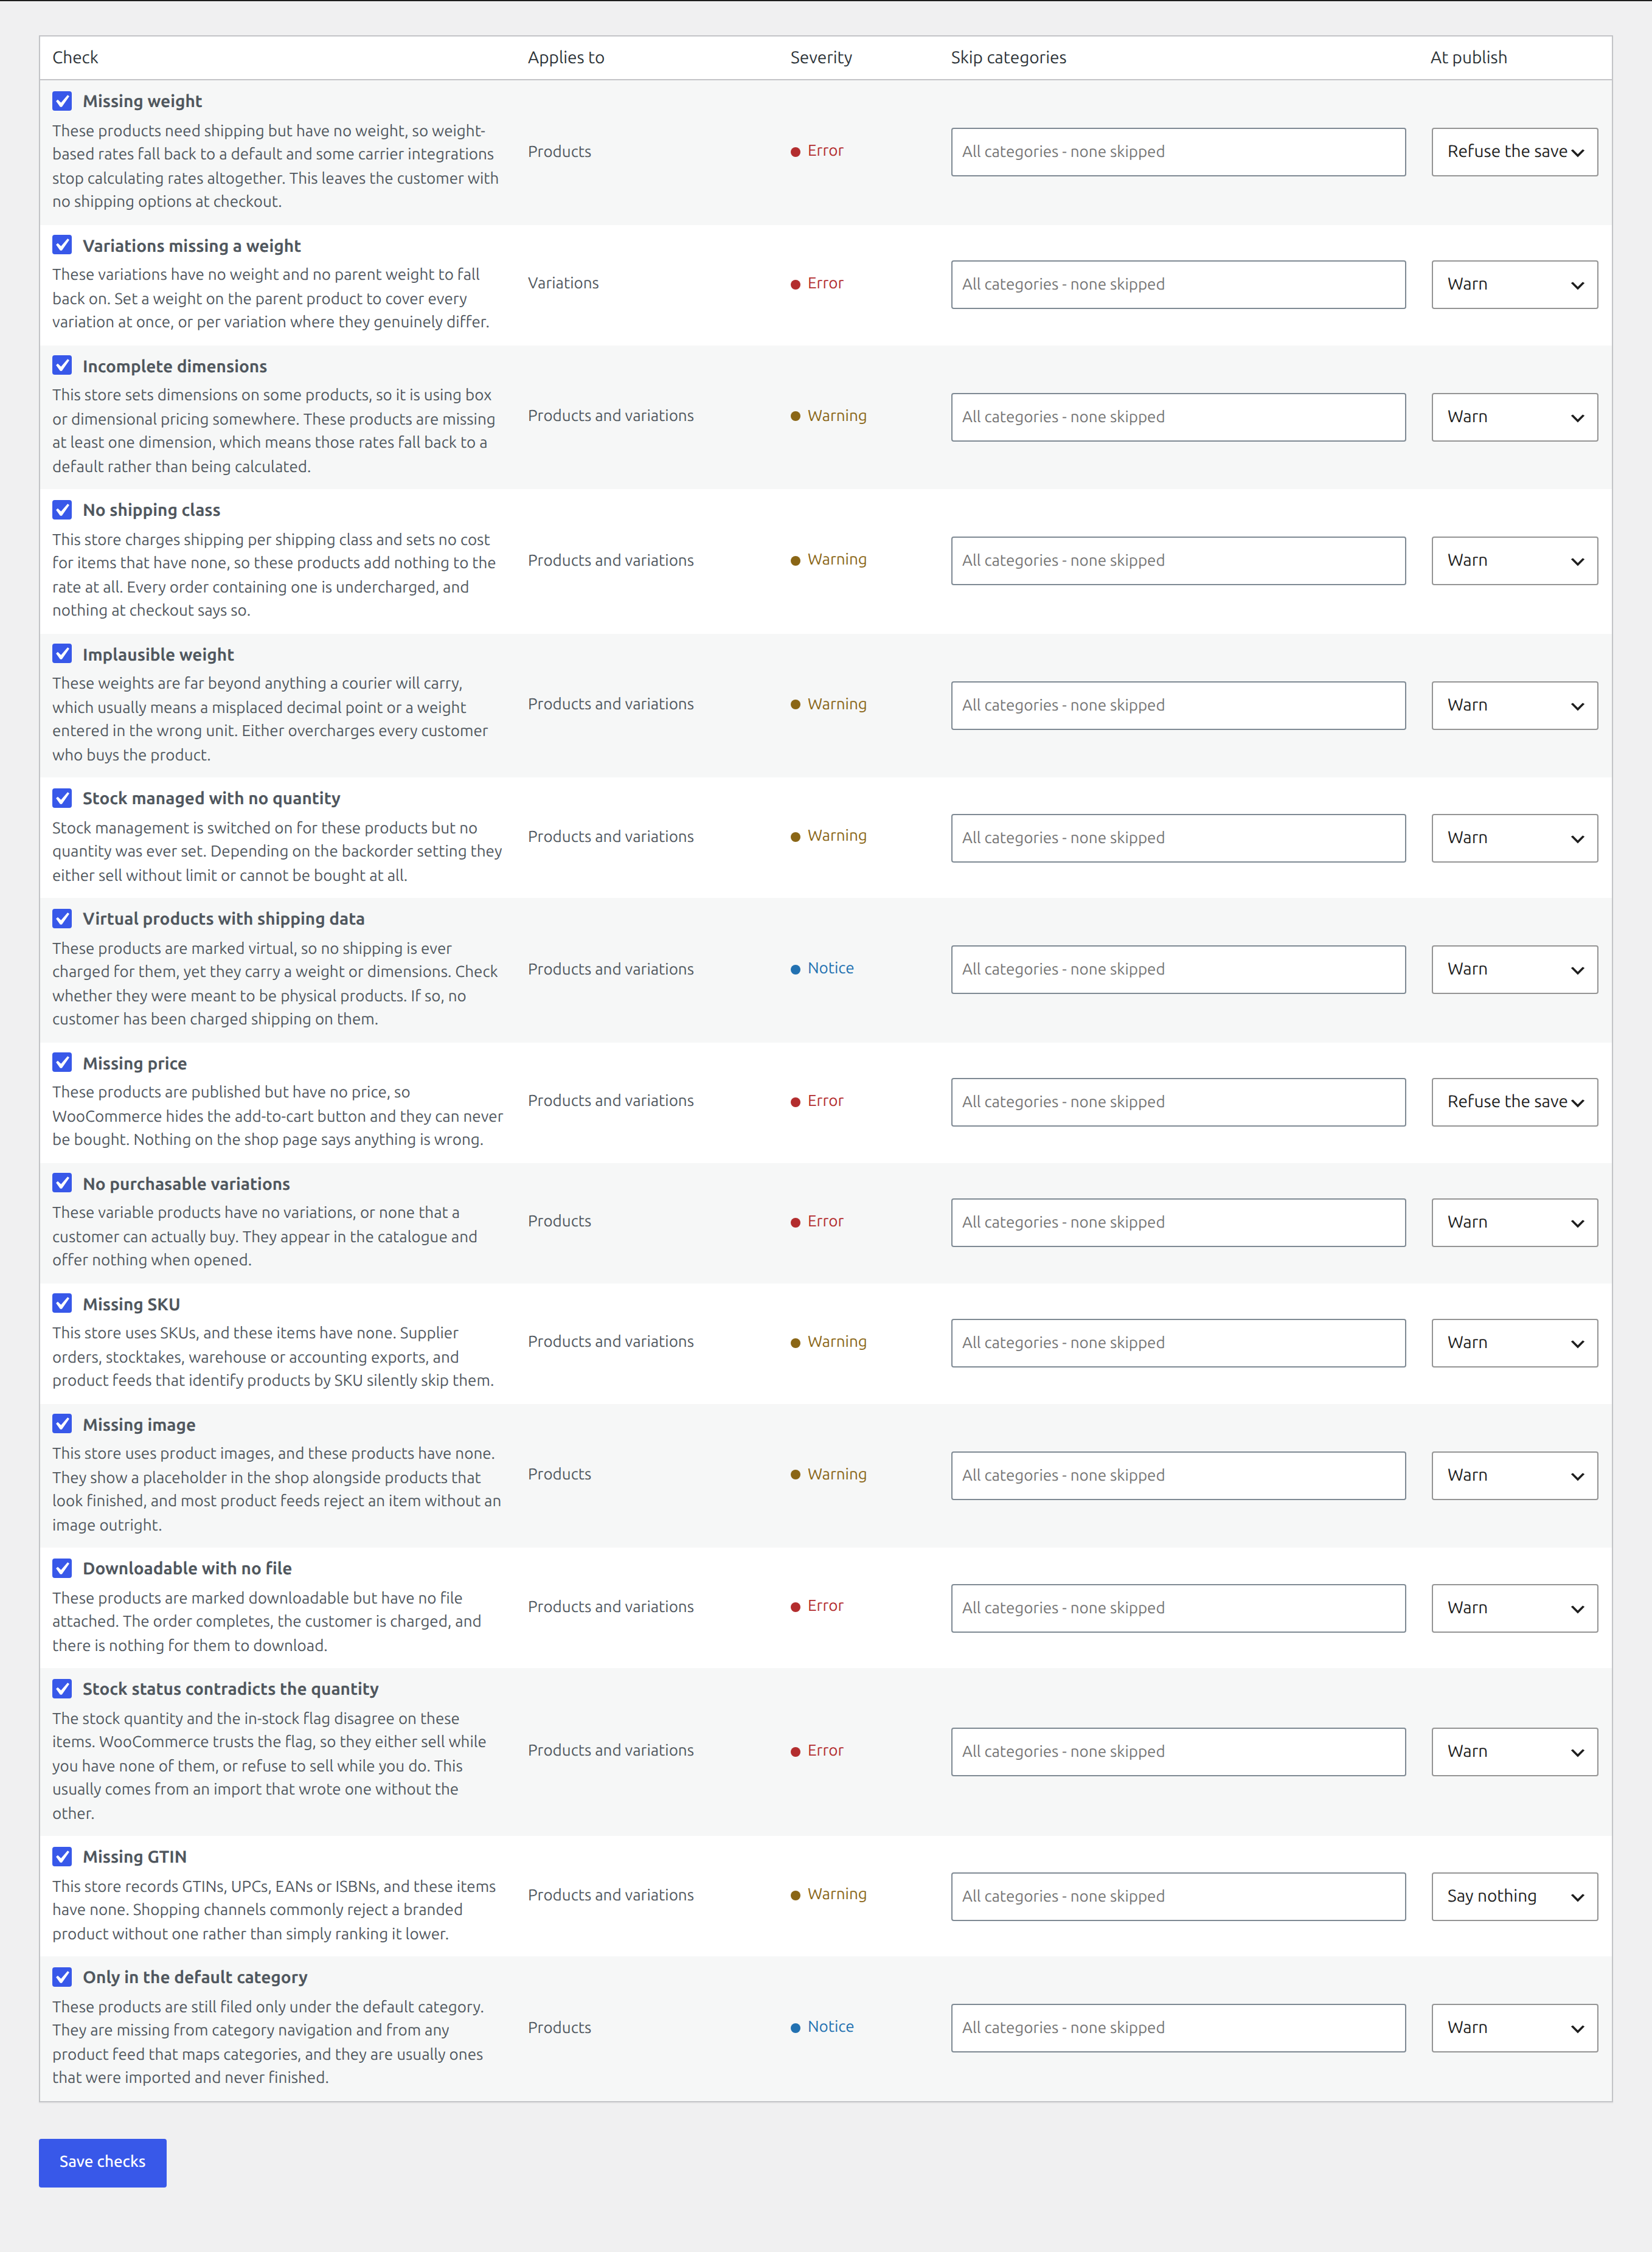
- Leave most checks on Warn.
- Set Missing weight to Block. In this store a shipped product without a weight is priced wrong on every order, so it should not go live at all.
- Set one noisy check to Nothing. It still reports on the findings screen; it just stops interrupting anyone.
- Save.
Blocking is opt-in per check on purpose: a rule that blocked everything would lock you out of your own catalogue on the day you installed it.
10. Premium continuation: watch a publish be refused
Edition: Premium
Open: Products → Add New
- Create a physical product with a price and no weight.
- Press Publish.
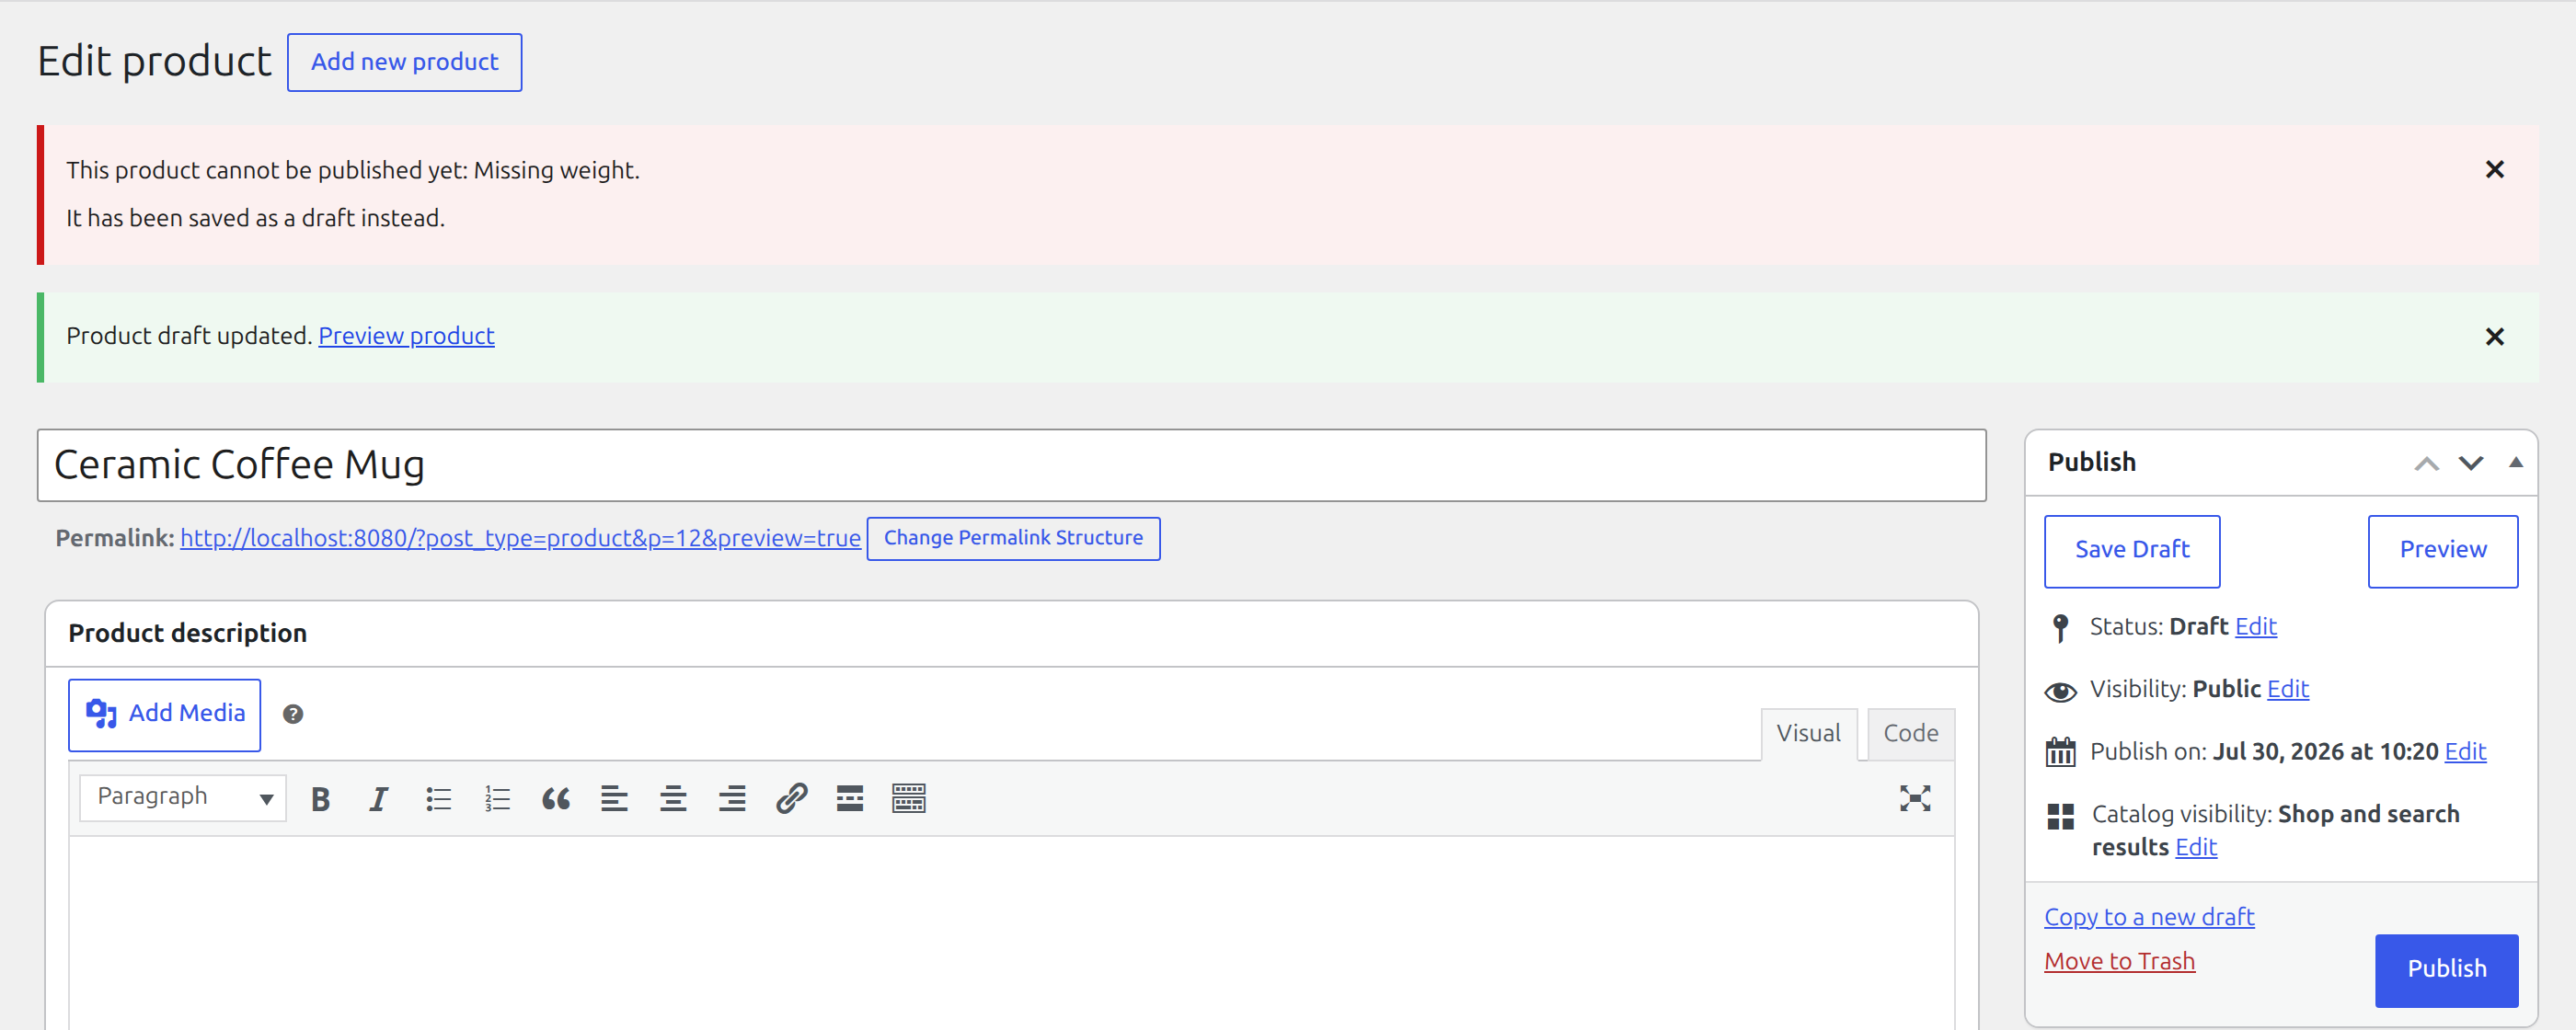
The two editors behave differently, and the difference is visible to whoever hits it:
- The new product editor and the REST API get a real error, so the save genuinely fails.
- The classic editor cannot refuse a save at that point, so the product is kept as a draft and told why.
Now set a weight and publish again: it goes through. Then check that your supplier feed still runs. The WooCommerce CSV importer and programmatic saves are recorded, never refused, because a nightly feed that fails stops the business. Those products land in the findings list like any other.
11. Premium continuation: clear a whole check in bulk
Edition: Premium
Open: WooCommerce → Product Data Checks → Review, on the Variations missing a weight row
Pro adds a Bulk actions control above a check’s own list, with a checkbox on every row.
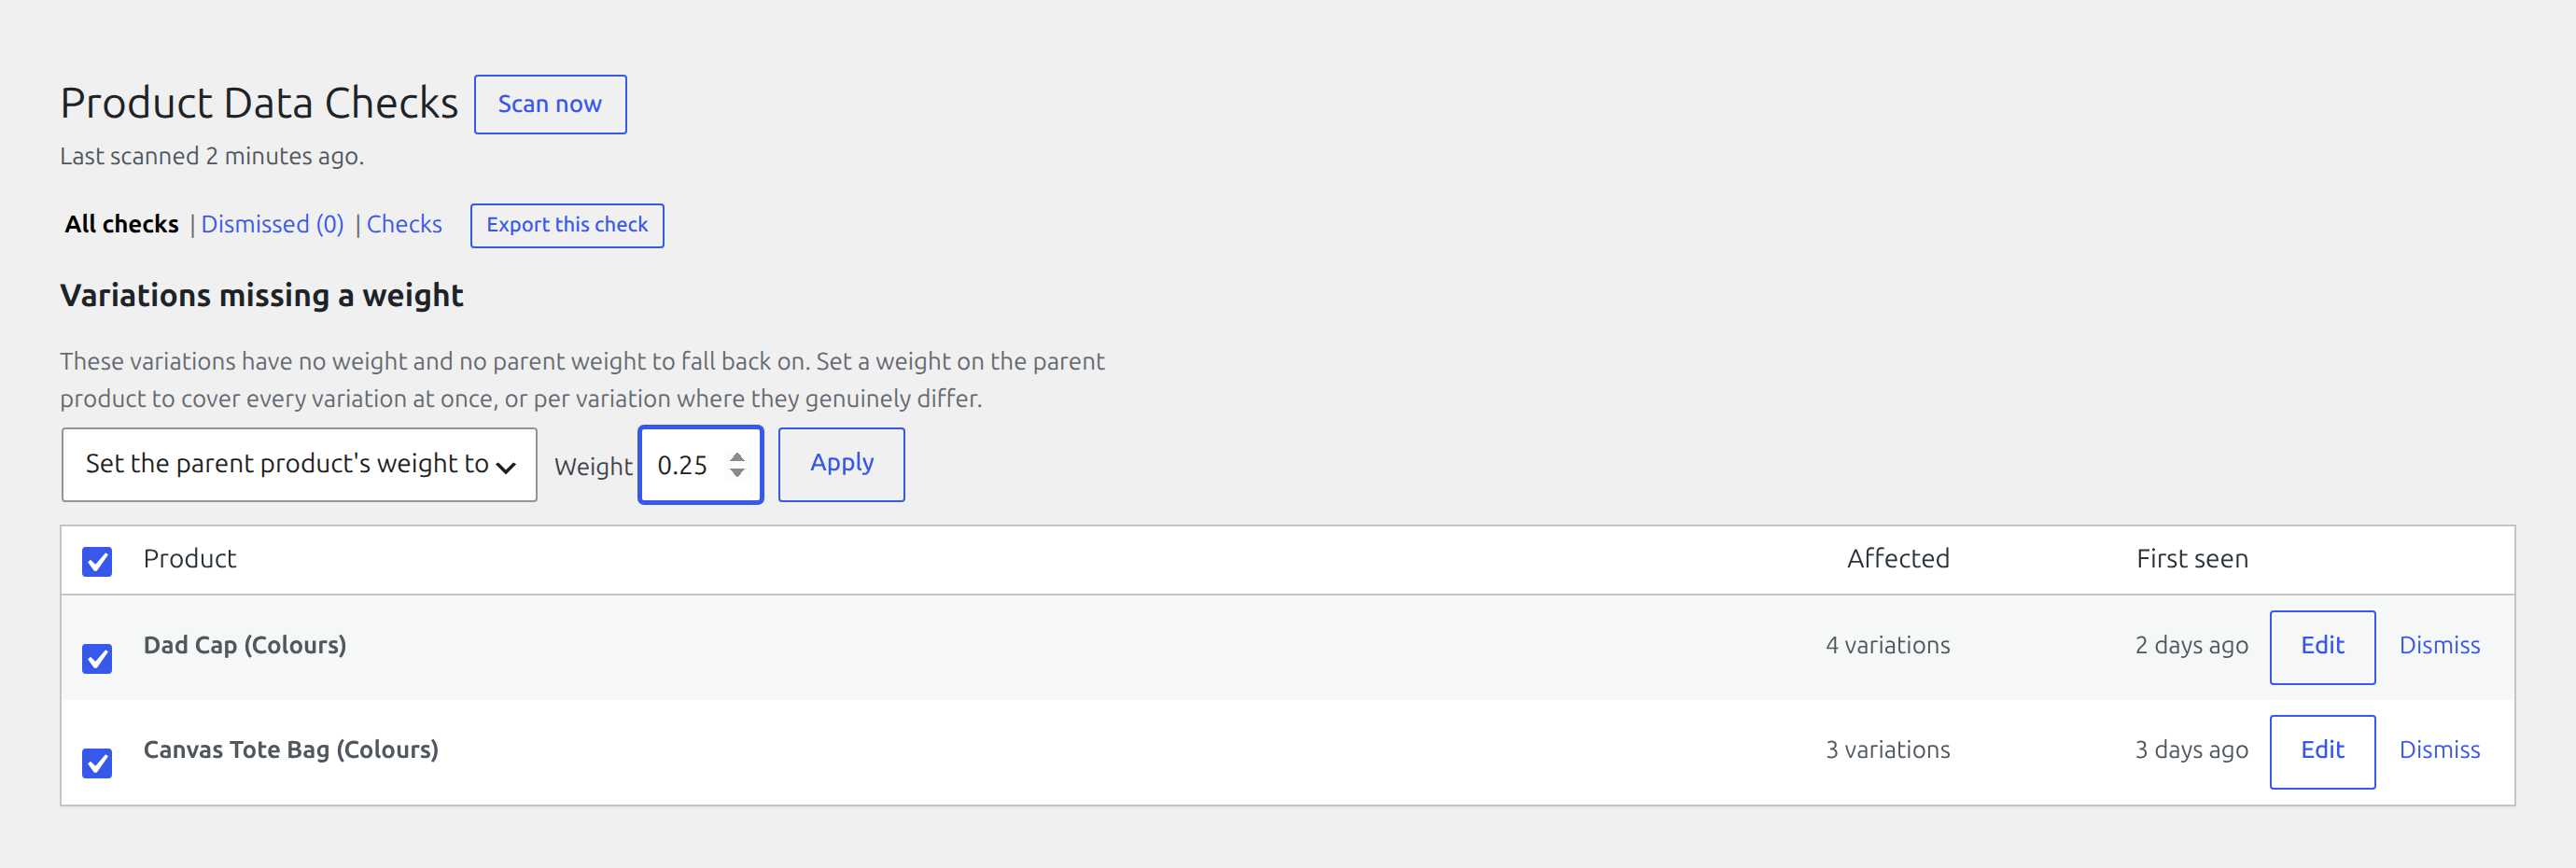
- Select both listed products.
- Choose Set the parent product’s weight to and enter the weight.
- Apply.
You never choose products and fields the way a bulk editor works. You choose a check, and the check decides what the fix does. That is what makes applying one value to a whole selection safe.
Worth knowing before you rely on it: each product is re-checked before the write, so anything you fixed by hand since the last scan is left alone; only the values actually missing are set; an empty box is never treated as zero; and dismissed findings are never touched. A check whose fix would be a guess, with Implausible weight as the clearest example, is offered none at all.
12. Premium continuation: hand the list to somebody else
Edition: Premium
Open: WooCommerce → Product Data Checks
Pro adds Export findings beside the screen’s own navigation.
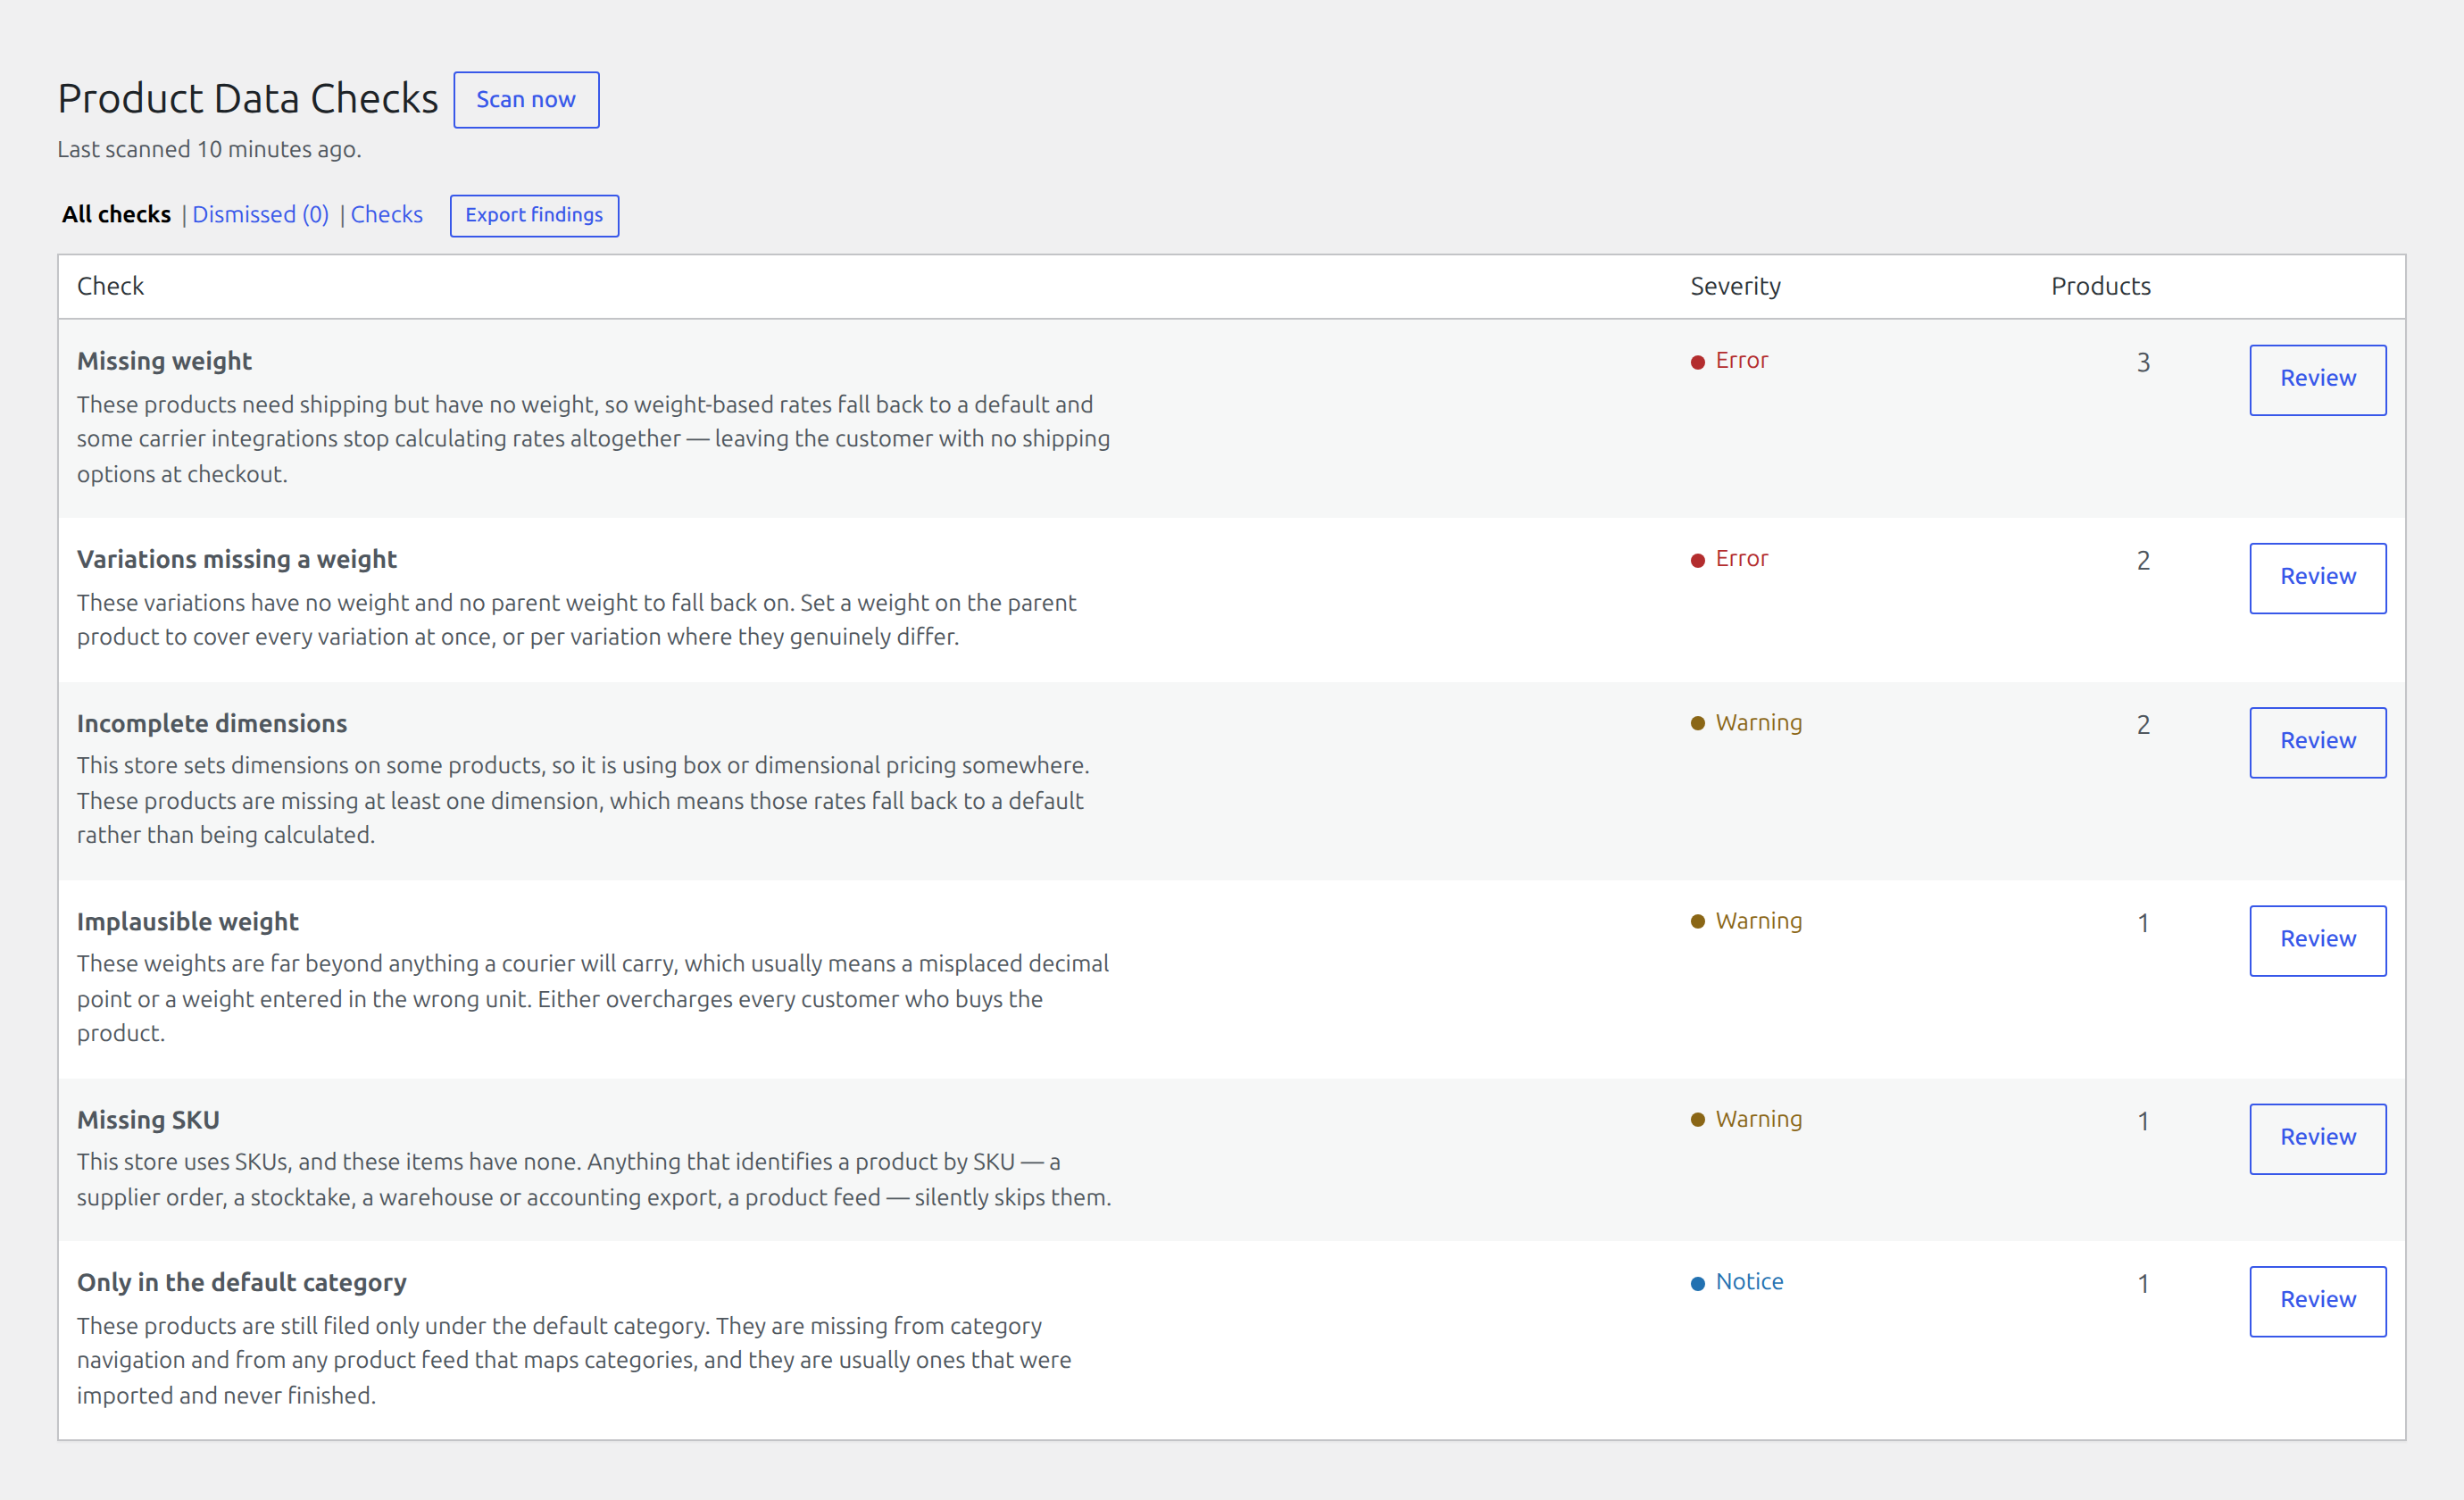
- Export from the full list to get everything still open.
- Open a check and export again to get that check alone.
Each row carries both the check’s key for a spreadsheet formula to match and its readable name for the person who has to act on it. It also names the product or variation it belongs to, so the file is a work list rather than a summary. Dismissed findings are left out, because a dismissal is a decision that the work is not needed.
13. Premium continuation: scan on a schedule, hear only what is new
Edition: Premium
Open: WooCommerce → Product Data Checks → Checks
Below the checks form, Pro adds a frequency and a list of digest recipients.
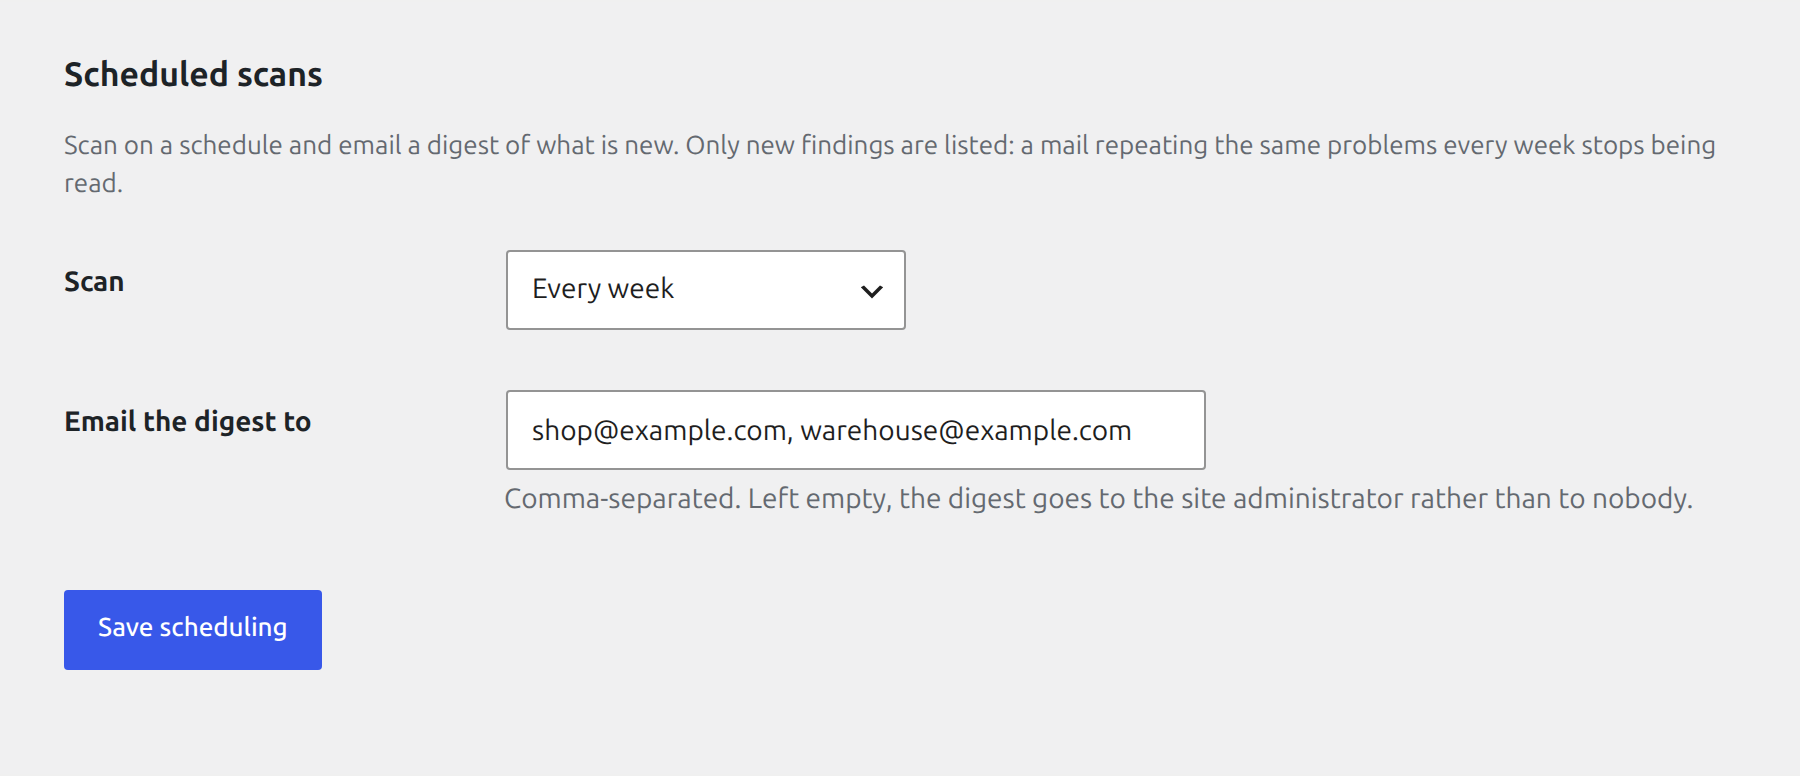
- Set the frequency to Weekly. Scheduling is off by default.
- Enter the address of whoever fixes product data.
- Save.
The digest reports the findings that appeared since the last one, not the whole list, and nothing is sent when nothing changed. A mail repeating the same forty problems every week stops being read, and then the one new problem in week six is missed.
Daily workflow after setup
Once the walkthrough is done the routine is small:
- The scheduled scan runs and mails you only what is new.
- You open the findings screen, fix what is wrong in bulk where the check offers it, and dismiss what is deliberate.
- Enforcement keeps the same fault from being published again, while imports keep running and are recorded instead.
If a Pro licence ever lapses, Free is unaffected: it keeps scanning, reporting, and remembering findings. Pro stops enforcing rather than stopping your work, your per-check settings and schedule are kept, and nothing you already fixed is undone.